Real-time script control and GUI interfaces in bash
While working on a script to batch-process items in parallel, I found the need to provide an interface that would let me control how the script was running, as well as provide a simple graphical overview of what was going on in the background.
You can do both at once using a combination of while loops and the dialog utility (or an equivalent called whiptail, depending on your distro). Dialog is a simple utility that allows wizard-like interactions over the command line. If run in a loop, dialog can be “refreshed” to display info as a script runs. This wiki page is a good starting point for learning the dialog command.
Painting a GUI
Every time you run dialog, you are essentially re-drawing the screen from scratch using the arguments and widgets you define in the command. The easiest way to get a refresh-able GUI is to put your dialog command into a function, and then call it in a while loop.
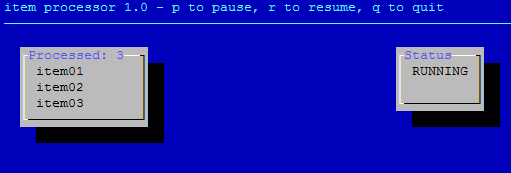
Below is a basic dialog GUI that displays data from a list of items at /path/to/processed_list:
scriptstatus="RUNNING"

function paint_ui {

  dialog --backtitle "item processor 1.0 - p to pause, r to resume, q to quit" \
  --begin 3 3 --title "Processed: `wc -l < /path/to/processed_list`" --infobox "`cat /path/to/processed_list`" 0 0 \
  --and-widget --title "Status" --begin 3 50 --infobox "${scriptstatus}" 0 0

}
- The back slashes are to break up the command and make it more readable
- --backtitle lets you set a string of text to use in the background
- --begin 3 3 sets the y and x coordinates of each widget, respectively
- --infobox is a good widget type if you just want to show data without any user input
- --and-widget lets you add additional widgets to the dialog window, such as progress bars, other info boxes, etc.
- The 0 0 is the height and width of a widget (0 means auto-size). If setting a custom size, the default behavior is to wrap text until it runs out of vertical space, then cut off anything extra. You can’t be 0 for one dimension and custom for another- it’s either all auto ( 0 0 ), or custom values for both.
- You can use variables, expansion and simple subshells in the title and text field arguments.
- Rather than cat-ting all content into an infobox, you can also use tools like head, tail, grep or tac to control how much data to display, and in what order.
The result will look something like this:
Real-time Script Control
This is one area where you can kill two birds with one stone- your input method can also act as a way to refresh the GUI.
See below, again assuming a list of items at /path/to/processed_list:
    scriptstatus="RUNNING"
    pausevar="n"

    function paint_ui {

      dialog --backtitle "item processor 1.0 - p to pause, r to resume, q to quit" \
      --begin 3 3 --title "Processed: `wc -l < /path/to/processed_list`" --infobox "`cat /path/to/processed_list`" 0 0 \
      --and-widget --title "Status" --begin 3 50 --infobox "${scriptstatus}" 0 0
    }

    function example_function {
      # doing important stuff here
      return 0
    }


    while true; do

      #redraw GUI

      paint_ui

      # If not paused, run example_function

      [ "$pausevar" == "n" ] && example_function

      # Read for input at a 5 second timeout (results in 5 second 'refresh' rate)

      while read -s -n 1 -t 5 command; do
        case $command in
        p|P)
         scriptstatus="PAUSED"
         pausevar="y"
         break
         ;;
        r|R)
         scriptstatus="RESUMED"
         pausevar="n"
         break
         ;;
        q|Q)
         # Breaks out of both while loops, effectively stopping the GUI.
         break 2
         ;;
        esac
      done

    done #outer loop

    exit 0
Some notes on the above:
- The idea is to run two while loops: an outer loop that runs forever and redraws the GUI, and an inner while read loop to check for input at a 5-second timeout interval.
- The read statement’s timeout value of -t 5 effectively acts as our “refresh rate” for the GUI. As soon as the read statement times out (or when we break out of it), the inner while loop ends, and the outer while loop will start from the top: it runs a GUI refresh, then kicks off the inner while read again for 5 seconds.
- When the user selects q for quit, we break out of both while loops at once with a break 2 , and the script proceeds to the exit 0. For the other input options, we issue a regular break to get out of the inner while read loop early, so that the GUI will refresh as soon as you enter your input.
- It is a good idea to add a “status” infobox and text string to your GUI, so that you can give visual feedback on any input you send.
- Another cool use-case: you can have a command or function run at each refresh of the while loop, but change how it runs based on user input (in this case we stop running the example_function every refresh if the user hits pause).


Comments